
This is how I turned a Raspberry Pi into a router and WiFi Access Point. The hardware I used is:
- 1 Raspberry Pi 3 B+
- 1 USB Gigabit Network Adapters
- 1 32 GB MicroSD card
- 1 1ft Ethernet RJ45 cable
- 1 Modem
To do this little project I purchased a Raspberry Pi 3 B+ (Element 14), a USB to Ethernet Gigabit adapter (UGREEN), a 32 GB MicroSD Ultra card (SanDisk), a cool Raspberry Pi 3 case with fan and heat-sinks (iUniker), a 2 m long Micro USB to USB cable (to power the Raspberry Pi), a 3A USB Wall Plug and a short (1 ft) Ethernet cable. In all, I spent $75.20.
I preferred the Pi 3 B+ model because it supports Gigabit Ethernet over USB. , whereas the included Ethernet adapter is only 100 Mbits/s (according to the specifications.)
Preparing and loading the Raspbian system
In my Debian Desktop I first prepared the microSD card.
Insert the microSD card into a MicroSD slot, or using a SD adapter into a SD slot, or using a SD to USB adapter into a USB port, whichever is convenient. If you use an adapter, make sure it does not lock the miniSD card in read-only mode.
Install gparted,
# apt-get install gparted
To see into which device the microSD card is attached to look in ‘/var/log/syslog‘,
# tail -f /var/log/syslog
while inserting the card. It usually looks like this
 May  2 14:47:13 bauda kernel: [86400.433038] scsi 4:0:0:0: Direct-Access     Generic  STORAGE DEVICE   9407 PQ: 0 ANSI: 0
 May  2 14:47:13 bauda kernel: [86400.433800] sd 4:0:0:0: Attached scsi generic sg3 type 0
 May  2 14:47:13 bauda kernel: [86400.593705] sd 4:0:0:0: [sdc] 7626752 512-byte logical blocks: (3.90 GB/3.64 GiB)
 May  2 14:47:13 bauda kernel: [86400.594940] sd 4:0:0:0: [sdc] Write Protect is off
 May  2 14:47:13 bauda kernel: [86400.594942] sd 4:0:0:0: [sdc] Mode Sense: 03 00 00 00
 May  2 14:47:13 bauda kernel: [86400.596199] sd 4:0:0:0: [sdc] No Caching mode page found
 May  2 14:47:13 bauda kernel: [86400.596205] sd 4:0:0:0: [sdc] Assuming drive cache: write through
 May  2 14:47:13 bauda kernel: [86400.602191]  sdc:
 May  2 14:47:13 bauda kernel: [86400.605804] sd 4:0:0:0: [sdc] Attached SCSI removable disk
Run gparted and select the device (/dev/sdc in the example). Delete any existing partition and save the changes.
Download the Raspbian Stretch Lite image from https://www.raspberrypi.org/downloads/raspbian/. I prefer the Lite version because it does not include a Desktop Environment, which for the application at hand is superfluous.
Extract the image (.img) from de zip file and copy it to the microSD card with,
# dd bs=4M if=2019-04-08-raspbian-stretch-lite.img of=/dev/sdc status=progress conv=fsync
Make sure the output file (of=) has the correct device. It may take several minutes to copy the image.
Preparing and configuring the Raspberry Pi
Insert the microSD with the new Raspbian Stretch Lite operating system into the Raspberry Pi microSD slot. Attach a display, a keyboard and connect a RJ45 Ethernet cable from the Pi’s LAN port to a LAN port in your existing router. Boot the Raspberry Pi.
At this point the Raspberry Pi needs some basic system configurations.
Login into the default Raspbian user pi with the default password raspberry. At the prompt change the user password with ‘passwd‘ to something secure.
Become root by running the command ‘sudo su -‘. As root, run the command ‘raspi-config‘,
Move the cursor to,
2 Network Options
   N3 Network interface names
and enable predictable network interface names. This step forces unique name assignments of the USB interfaces to be “enx” followed by the hardware MAC address, and bypasses the new systemd/udev automatic assignments, which works fine for PCI/X network adapters, but will change the names of USB adapters upon reboot.
Move the cursor to,
2 Network Options
   N1 Hostname
and change the hostname. I called mine simply “router”.
Move the cursor to,
5 Interfacing Options
   P2 SSH
and enable the SSH server.
Finish the setup. Reboot.
Log in into to pi user with the new password. Become root again and write down the USB adapter’s name by running ifconfig,
enxb827eb28828c: flags=4099  mtu 1500
         ether b8:27:eb:28:82:8c  txqueuelen 1000  (Ethernet)
         RX packets 0  bytes 0 (0.0 B)
         RX errors 0  dropped 0  overruns 0  frame 0
         TX packets 0  bytes 0 (0.0 B)
         TX errors 0  dropped 0 overruns 0  carrier 0  collisions
The “enxb827eb28828c” adapter is going to connect to the Internet, whereas the “wlan0” wireless adapter is going to connect the internal wireless network (WLAN).
To configure the adapter that is going to connect to the Internet, create a new file with the name of the adapter,
# nano /etc/network/interfaces.d/enxb827eb28828c
Add to the file,
auto enxb827eb28828c
iface enxb827eb28828c inet dhcp
I assume here your Internet provider assigns you a public IP via DHCP.
Next, configure the adapter that is going to connect the wireless internal network (WLAN),
# nano /etc/network/interfaces.d/wlan0
Assign it a static IP in a private network,
auto wlan0
iface wlan0 inet static
         address 192.168.0.1
         netmask 255.255.255.0
         network 192.168.0.0
         broadcast 192.168.0.255
Notice that there is no gateway defined. This is intentional.
BIND9
Install BIND9 and DNS utilities,
# apt-get install bind9 dnsutils
Write down in a piece of paper the Internet provider’s DNS server IPs given in the “nameserver” directive in ‘/etc/resolv.conf'. The provider usually has a primary and secondary DNS. The DHCP client will automatically write ‘/etc/resolv.conf‘ with the values given by the provider’s DHCP server.
Overwrite ‘/etc/resolv.conf‘,
# echo "nameserver 127.0.0.1" > /etc/resolv.conf
The system DNS is now localhost.
To avoid having the DCHP client editing the file, create a hook. Create a new script,
# nano /etc/dhcp/dhclient-enter-hooks.d/nodnsupdate
then add to the file an empty replacement function,
#!/bin/sh
make_resolv_conf(){
 :
}
Give the new file execution permission,
# chmod +x /etc/dhcp/dhclient-enter-hooks.d/nodnsupdateThis new function does not return a value, and therefore the IP in ‘/etc/resolv.conf is not updated by the DCHP client.
Restart bind9,
# invoke-rc.d bind9 restart
Resolve a name, for example,
# dig calel.net
should return the domain IP and a list of ROOT servers,
 ; <<>> DiG 9.10.3-P4-Raspbian <<>> calel.net
 ;; global options: +cmd
 ;; Got answer:
 ;; ->>HEADER<<- opcode: QUERY, status: NOERROR, id: 59298
 ;; flags: qr rd ra; QUERY: 1, ANSWER: 1, AUTHORITY: 13, ADDITIONAL: 1

 ;; OPT PSEUDOSECTION:
 ; EDNS: version: 0, flags:; udp: 4096
 ;; QUESTION SECTION:
 ;calel.net.            IN  A

 ;; ANSWER SECTION:
 calel.net.        604323  IN  A   68.66.193.165

 ;; AUTHORITY SECTION:
 .            516618  IN  NS  a.root-servers.net.
 .            516618  IN  NS  e.root-servers.net.
 .            516618  IN  NS  f.root-servers.net.
 .            516618  IN  NS  b.root-servers.net.
 .            516618  IN  NS  h.root-servers.net.
 .            516618  IN  NS  j.root-servers.net.
 .            516618  IN  NS  k.root-servers.net.
 .            516618  IN  NS  m.root-servers.net.
 .            516618  IN  NS  l.root-servers.net.
 .            516618  IN  NS  g.root-servers.net.
 .            516618  IN  NS  i.root-servers.net.
 .            516618  IN  NS  c.root-servers.net.
 .            516618  IN  NS  d.root-servers.net.

 ;; Query time: 1 msec
 ;; SERVER: 127.0.0.1#53(127.0.0.1)
 ;; WHEN: Thu May 09 09:34:44 PDT 2019
 ;; MSG SIZE  rcvd: 262
This output tells us that the DNS server (127.0.0.1) is contacting the authoritative ROOT servers of .net directly, that is, it is functioning as an autonomous DNS. Try some .com, .org and other TLDs of interest.
Edit ‘/etc/bind/named.conf.options‘. In the section “options” you may want to use the provider’s DNS servers instead by adding the primary and secondary DNS IPs in “forwarders“. This will cause the server to be lower in hierarchy, just below your provider’s hierarchy level. If the autonomous DNS server is functioning, there is little advantage in using the provider’s, or any public DNS. Using your own DNS improves the privacy of your network.
Right after “forwarders” add,
     allow-query-cache { 127.0.0.0/8; 192.168.0.0/24; };
     allow-recursion { 127.0.0.0/8; 192.168.0.0/24; };
This will allow localhost and the internal wireless network to query the cache and issue recursive queries. This will also prevent DoS attacks from external sources.
After the end of section “options” add a “logging” section,
logging {
     channel query_logging {
        file "/var/log/named/query.log";
        print-time yes;
     };
     category queries {
        query_logging;
     };
};
Create the log directory and give it the correct ownership,
# mkdir /var/log/named/
# chown bind: /var/log/named/
Restart the DNS server again,
# invoke-rc.d bind9 restart
The DNS log is saved in ‘/var/log/named/query.log‘ and needs to be rotated. Create a logrotate config file with an editor,
# nano /etc/logrotate.d/bind9-query
and add,
/var/log/named/query.log {
        daily
        missingok
        rotate 7
        compress
        notifempty
        create 640 bind bind
        postrotate
        if [ -f /var/run/named/named.pid ]; then
                /usr/sbin/invoke-rc.d bind9 reload > /dev/null
        fi
        endscript
}
This will rotate the log file daily up to 7 times.
DHCP Server
Install the DHCP server,
# apt-get install isc-dhcp-server
Edit ‘/etc/default/isc-dhcp-server‘ and add the name of the WLAN interface to “INTERFACESv4“,
INTERFACESv4="wlan0"
Edit ‘/etc/dhcp/dhcpd.conf‘. Uncomment the “authoritative” directive and add a new subnet,
authoritative;

subnet 192.168.0.0 netmask 255.255.255.0 {
  range 192.168.0.2 192.168.0.254;
  option routers 192.168.0.1;
  option ip-forwarding off;
  option broadcast-address 192.168.0.255;
  option subnet-mask 255.255.255.0;
  option domain-name-servers 192.168.0.1;
  default-lease-time 2592000;
  max-lease-time 2592000;
}
Notice here in particular that the router and DNS server given to the querying DHCP clients is the router’s internal IP 192.168.0.1.
Restart the DHCP server,
# invoke-rc.d isc-dhcp-server restart
At this point we need to ask the DHCP client not to request an IP for “wlan0“. Edit ‘/etc/dhcpcd.conf‘ and add at the end,
denyinterfaces wlan0
and restart the DHCP client,
# invoke-rc.d dhcpcd restart
WiFi Access Point
Now we turn the Raspberry Pi’s wireless network adapter into a WiFi Access Point.
Install hostapd,
# apt-get install hostapd
Copy a basic configuration,
# zcat /usr/share/doc/hostapd/examples/hostapd.conf.gz > /etc/hostapd/hostapd.conf
Edit ‘/etc/hostapd/hostapd.conf‘ and add/modify the following instructions,
interface=wlan0
driver=nl80211
ssid=raspiAP
hw_mode=g
channel=6
ieee80211n=1
wmm_enabled=1
ht_capab=[HT40][SHORT-GI-20][DSSS_CCK-40]
macaddr_acl=0
auth_algs=1
ignore_broadcast_ssid=0
wpa=2
wpa_passphrase=[passphrase]
wpa_key_mgmt=WPA-PSK
wpa_pairwise=TKIP
rsn_pairwise=CCMP
Change in particular the SSID name (raspiAP) and passphase ([passphrase]) with your own values.
Edit ‘/etc/default/hostapd‘ and modify,
DAEMON_CONF="/etc/hostapd/hostapd.conf"
Activate the systems service init configuration,
# systemctl unmask hostapd
# systemctl enable hostapd
Restart the hostapd daemon,
# invoke-rc.d hostapd restart
At this point you may want to check that the SSID “raspiAP” is visible by scanning for wireless networks with any WiFi device (your mobile phone is an easy option.)
IP forwarding
To make the server a router, enable kernel IP forwarding,
# echo 1 > /proc/sys/net/ipv4/ip_forward
Edit ‘/etc/sysctl.conf‘ and uncomment,
net.ipv4.ip_forward=1
so that forwarding is enabled at boot.
IP masquerading
The internet network traffic will be routed from the WLAN interface to the Internet interface and vice versa, but before it can work, we need to rewrite the internal IP addresses with the public IP address given to the Internet interface. Otherwise, the internal network connections will be blocked (spoofing). The rewrite is called IP masquerading and is done with iptables, the Linux kernel packet filtering tool.
Since iptables is used to set up rules to the kernel packet filter tables, also known as a firewall, I will present here a full firewall.
Create the file ‘/etc/network/if-pre-up.d/firewall‘ with an editor.
Add,
#!/bin/sh

# Author: Ricardo Yanez ricardo.yanez@calel.org

IPTABLES=/sbin/iptables

if [ ! -x $IPTABLES ]; then
 exit 0
fi

# loopback
LO_IP="127.0.0.0/8"

# WLAN
WLAN_IP_RANGE="192.168.0.0/24"

if [ "$IFACE" = "lo" ]; then
 $IPTABLES -F
 $IPTABLES -X
 $IPTABLES -t nat -F
 $IPTABLES -t nat -X

 $IPTABLES -P INPUT DROP
 $IPTABLES -P FORWARD DROP
 $IPTABLES -P OUTPUT ACCEPT

 ###############################################
 ############### INPUT chain ###################
 ###############################################

 # 1) new not in syn
 $IPTABLES -A INPUT -p TCP -m state --state NEW ! --syn -j DROP

 # established, related
 $IPTABLES -A INPUT -i $IFACE -m state --state ESTABLISHED,RELATED -j ACCEPT

 # loopback
 $IPTABLES -A INPUT -i $IFACE -s $LO_IP -j ACCEPT
 $IPTABLES -A INPUT -i $IFACE -s $WLAN_IP_RANGE -j ACCEPT
 $IPTABLES -A INPUT -i $IFACE -j ACCEPT

 ###############################################
 ############## FORWARD chain ##################
 ###############################################

 # new not in syn
 $IPTABLES -A FORWARD -p TCP -m state --state NEW ! --syn -j DROP

 ###############################################
 ############## OUTPUT chain ###################
 ###############################################

 # new not in syn
 $IPTABLES -A OUTPUT -p TCP -m state --state NEW ! --syn -j DROP

 # established, related
 $IPTABLES -A OUTPUT -o $IFACE -m state --state ESTABLISHED,RELATED -j ACCEPT

 # new
 $IPTABLES -A OUTPUT -o $IFACE -m state --state NEW -j ACCEPT
fi
Set the permissions to executable,
# chmod 750 /etc/network/if-pre-up.d/firewall
These are some basic rules that will be loaded before any interface is brought up. Important here to notice is that the policy for the INPUT and FORWARD chains are set to DROP. This adds an extra security layer, but means you have to explicitly allow new connections to either chain.
Next, create the file ‘/etc/network/if-up.d/firewall‘ with an editor. Add,
#!/bin/sh

# Author: Ricardo Yanez ricardo.yanez@calel.org

IPTABLES="/sbin/iptables"

# external interface
INET_IFACE="enxb827eb28828c"

# WLAN interface
WLAN_IFACE="wlan0"
WLAN_IP="192.168.0.1"
WLAN_IP_RANGE="192.168.0.0/24"

if [ "$IFACE" = "$INET_IFACE" ]; then

 # "block-spoof" chain
 $IPTABLES -N block-spoof
 $IPTABLES -A block-spoof -i $IFACE -s 10.0.0.0/8 -j DROP
 $IPTABLES -A block-spoof -i $IFACE -s 172.16.0.0/12 -j DROP
 $IPTABLES -A block-spoof -i $IFACE -s 192.168.0.0/16 -j DROP

 # "allowed-icmp-packets" chain
 $IPTABLES -N allowed-icmp-packets
 $IPTABLES -A allowed-icmp-packets -p ICMP --icmp-type 8 -m limit --limit 1/second --limit-burst 3 -j ACCEPT
 $IPTABLES -A allowed-icmp-packets -p ICMP -j DROP

 # "allowed-udp-packets" chain
 $IPTABLES -N allowed-udp-packets
 $IPTABLES -A allowed-udp-packets -p UDP -m state --state NEW --dport 53 -j ACCEPT
 $IPTABLES -A allowed-udp-packets -p UDP -m state --state NEW --dport 123 -j ACCEPT
 $IPTABLES -A allowed-udp-packets -p UDP -m state --state NEW -j DROP

 # "allowed-tcp-packets" chain
 $IPTABLES -N allowed-tcp-packets
 $IPTABLES -A allowed-tcp-packets -p TCP -m state --state NEW --dport 53 -j ACCEPT

 ###############################################
 ############### INPUT chain ###################
 ###############################################

 # established, related
 $IPTABLES -A INPUT -i $IFACE -m state --state ESTABLISHED,RELATED -j ACCEPT

 $IPTABLES -A INPUT -i $IFACE -j block-spoof
 $IPTABLES -A INPUT -i $IFACE -j blocked-packets
 $IPTABLES -A INPUT -i $IFACE -p ICMP -j allowed-icmp-packets
 $IPTABLES -A INPUT -i $IFACE -p UDP -j allowed-udp-packets
 $IPTABLES -A INPUT -i $IFACE -p TCP -j allowed-tcp-packets

 # log discarded INPUT chain packets
 $IPTABLES -A INPUT -i $IFACE -j LOG --log-level debug --log-prefix "iptables DROP INPUT: "

 ###############################################
 ############## FORWARD chain ##################
 ###############################################

 # log discarded FORWARD chain packets
 $IPTABLES -A FORWARD -i $IFACE -j LOG --log-level debug --log-prefix "iptables DROP FORWARD: "

 ###############################################
 ############## OUTPUT chain ###################
 ###############################################

 # established, related
 $IPTABLES -A OUTPUT -o $IFACE -m state --state ESTABLISHED,RELATED -j ACCEPT

 # ICMP packets
 $IPTABLES -A OUTPUT -o $IFACE -p ICMP --icmp-type 8 -j ACCEPT

 # UDP packets
 $IPTABLES -A OUTPUT -o $IFACE -p UDP -m state --state NEW --dport 53 -j ACCEPT    # dns
 $IPTABLES -A OUTPUT -o $IFACE -p UDP -m state --state NEW --dport 67 -j ACCEPT    # bootps
 $IPTABLES -A OUTPUT -o $IFACE -p UDP -m state --state NEW --dport 123 -j ACCEPT   # ntp

 # TCP packets
 $IPTABLES -A OUTPUT -o $IFACE -p TCP -m state --state NEW --dport 43 -j ACCEPT    # whois
 $IPTABLES -A OUTPUT -o $IFACE -p TCP -m state --state NEW --dport 53 -j ACCEPT    # dns
 $IPTABLES -A OUTPUT -o $IFACE -p TCP -m state --state NEW --dport 67 -j ACCEPT    # bootps
 $IPTABLES -A OUTPUT -o $IFACE -p TCP -m state --state NEW --dport 80 -j ACCEPT    # http
 $IPTABLES -A OUTPUT -o $IFACE -p TCP -m state --state NEW --dport 443 -j ACCEPT   # https

 # log rest of OUTPUT chain packets
 $IPTABLES -A OUTPUT -o $IFACE -m state --state NEW -j LOG --log-level debug --log-prefix "iptables NEW OUTPUT: "
fi

if [ "$IFACE" = "$WLAN_IFACE" ]; then

 ###############################################
 ############### INPUT chain ###################
 ###############################################

 # established, related
 $IPTABLES -A INPUT -i $IFACE -s $WLAN_IP_RANGE -m state --state ESTABLISHED,RELATED -j ACCEPT

 # ICMP packets
 $IPTABLES -A INPUT -i $IFACE -s $WLAN_IP_RANGE -p ICMP --icmp-type 8 -m limit --limit 1/second --limit-burst 3 -j ACCEPT
   $IPTABLES -A INPUT -i $IFACE -s $WLAN_IP_RANGE -p ICMP -j DROP

 # UDP packets
 $IPTABLES -A INPUT -i $IFACE -s $WLAN_IP_RANGE -p UDP -m state --state NEW --dport 53 -j ACCEPT    # dns
 $IPTABLES -A INPUT -i $IFACE -s $WLAN_IP_RANGE -p UDP -m state --state NEW --dport 67 -j ACCEPT    # bootsp
 $IPTABLES -A INPUT -i $IFACE -s $WLAN_IP_RANGE -p UDP -m state --state NEW --dport 123 -j ACCEPT   # ntp

 # TCP packets
 $IPTABLES -A INPUT -i $IFACE -s $WLAN_IP_RANGE -p TCP -m state --state NEW --dport 22 -j ACCEPT    # ssh
 $IPTABLES -A INPUT -i $IFACE -s $WLAN_IP_RANGE -p TCP -m state --state NEW --dport 53 -j ACCEPT    # dns
 $IPTABLES -A INPUT -i $IFACE -s $WLAN_IP_RANGE -p TCP -m state --state NEW --dport 80 -j ACCEPT    # http

 # log rest of LAN INPUT chain packets
 $IPTABLES -A INPUT -i $IFACE -m state --state NEW -j LOG --log-level debug --log-prefix "iptables LAN NEW INPUT: "

 ###############################################
 ############## FORWARD chain ##################
 ###############################################

 # established, related
 $IPTABLES -A FORWARD -i $INET_IFACE -o $IFACE -m state --state ESTABLISHED,RELATED -j ACCEPT
 $IPTABLES -A FORWARD -i $IFACE -o $INET_IFACE -m state --state ESTABLISHED,RELATED -j ACCEPT

 # block external FORWARD requests to LAN  $IPTABLES -A FORWARD -i $INET_IFACE -o $IFACE -m state --state NEW -j DROP

 # ICMP packets
 $IPTABLES -A FORWARD -i $IFACE -o $INET_IFACE -p ICMP --icmp-type 8 -m limit --limit 1/second --limit-burst 3 -j ACCEPT
 $IPTABLES -A FORWARD -i $IFACE -o $INET_IFACE -p ICMP -j DROP

 # UDP packets
 $IPTABLES -A FORWARD -i $IFACE -o $INET_IFACE -p UDP -m state --state NEW --dport 53 -j ACCEPT    # dns
 $IPTABLES -A FORWARD -i $IFACE -o $INET_IFACE -p UDP -m state --state NEW --dport 80 -j ACCEPT    # http
 $IPTABLES -A FORWARD -i $IFACE -o $INET_IFACE -p UDP -m state --state NEW --dport 123 -j ACCEPT   # ntp
 $IPTABLES -A FORWARD -i $IFACE -o $INET_IFACE -p UDP -m state --state NEW --dport 443 -j ACCEPT   # https
 $IPTABLES -A FORWARD -i $IFACE -o $INET_IFACE -p UDP -m state --state NEW --dport 5353 -j ACCEPT  # Multicast DNS

 # TCP packets
 $IPTABLES -A FORWARD -i $IFACE -o $INET_IFACE -p TCP -m state --state NEW --dport 22 -j ACCEPT    # ssh
 $IPTABLES -A FORWARD -i $IFACE -o $INET_IFACE -p TCP -m state --state NEW --dport 43 -j ACCEPT    # whois
 $IPTABLES -A FORWARD -i $IFACE -o $INET_IFACE -p TCP -m state --state NEW --dport 53 -j ACCEPT    # dns
 $IPTABLES -A FORWARD -i $IFACE -o $INET_IFACE -p TCP -m state --state NEW --dport 80 -j ACCEPT    # http
 $IPTABLES -A FORWARD -i $IFACE -o $INET_IFACE -p TCP -m state --state NEW --dport 443 -j ACCEPT   # https
 $IPTABLES -A FORWARD -i $IFACE -o $INET_IFACE -p TCP -m state --state NEW --dport 465 -j ACCEPT   # smtps
 $IPTABLES -A FORWARD -i $IFACE -o $INET_IFACE -p TCP -m state --state NEW --dport 993 -j ACCEPT   # imaps

 # log rest of LAN FORWARD chain packets
 $IPTABLES -A FORWARD -i $IFACE -o $INET_IFACE -m state --state NEW -j LOG --log-level debug --log-prefix "iptables LAN NEW FORWARD: "

 ###############################################
 ############## OUTPUT chain ###################
 ###############################################

 # established, related
 $IPTABLES -A OUTPUT -o $IFACE -m state --state ESTABLISHED,RELATED -j ACCEPT

 # ICMP packets
 $IPTABLES -A OUTPUT -o $IFACE -p ICMP --icmp-type 8 -m limit --limit 1/second --limit-burst 3 -j ACCEPT
 $IPTABLES -A OUTPUT -o $IFACE -p ICMP -j DROP

 # log rest of LAN OUTPUT chain packets
 $IPTABLES -A OUTPUT -o $IFACE -m state --state NEW -j LOG --log-level debug --log-prefix "iptables LAN NEW OUTPUT: "

 ###############################################
 ############## NAT chain ######################
 ###############################################

 $IPTABLES -t nat -F POSTROUTING
 $IPTABLES -t nat -F PREROUTING

 # IP masquerade
 INET_IP=ifconfig $INET_IFACE | grep -Eo 'inet (addr:)?([0-9]*\.){3}[0-9]*' | grep -Eo '([0-9]*\.){3}[0-9]*'
 $IPTABLES -t nat -A POSTROUTING -s $WLAN_IP_RANGE -o $INET_IFACE -j SNAT --to-source $INET_IP
fi
Set the permissions to executable,
# chmod 750 /etc/network/if-up.d/firewall
Notice in particular the names of INET_IFACE and WLAN_IFACE. These stand for the Internet (external) and WLAN (internal) interfaces, respectively. Change the names with the interface names of your router.
These rules are loaded when the external and internal interfaces are brought up. They are written for a general purpose server. Tailor the file to your needs. The rules to log requests to /var/log/debug are meant to help with that. Apple and Android devices, in particular, connect to unassigned ports continuously. You may wonder for what purpose, and decide to allow or block them. The logging rules may be commented out after debugging.
Notice in particular the NAT chain, defined only for the internal network. The variable “INET_IP” is set to the public IP of the external interface, and the next rule performs the actual masquerading.
To load the rules,
# export IFACE=lo ; /etc/network/if-pre-up.d/firewall ; export IFACE=enxb827eb28828c ; /etc/network/if-up.d/firewall ; export IFACE=wlan0 ; /etc/network/if-up.d/firewall
Notice here how the rules for the localhost interface are loaded first, then the external interface, then the internal interface.
The rules will be loaded at boot time when the interfaces are brought up. It may be advantageous to put the above command line in a shell script, which may then be executed every time a rule is changed, without having to reboot.
Connecting the router
Power down the Raspberry Pi and deattach the monitor and keyboard.
Disconnect your current router from the modem and connect the external interface of the Raspberry Pi router to the modem.
Boot the modem and new router.
Your new network should be up and running.
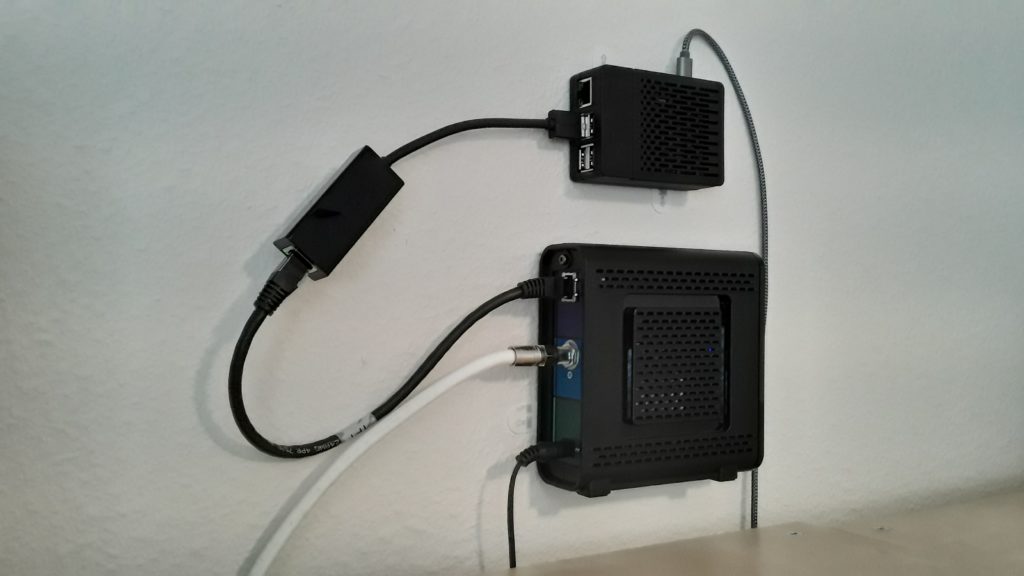
In this photo you can see my Motorola modem, connected to the Internet provider with the white coaxial cable, the modem connected to the USB external 1 Gigabit network interface of the Raspberry Pi, whose wireless network card acts as a WiFi Access Point. Both devices are attached to the wall with poster strips.
I currently have a total of 14 devices connected to the WiFi Access Point; a WiFi extender, Android cell phones, Apple TVs, iPads, tablets, desktops, laptops and another Raspberry Pi.
From an internal computer you may log in into the Raspberry Pi router. Its IP is 192.168.0.1. You may want to add an entry to your /etc/hosts to avoid having to type the IP number every time. I call it simply “router” and log in via SSH with ‘ssh pi@router‘. You will need to allow port 22 to connect to the internal interface in the INPUT chain, a rule that is already active in the firewall file.
The command ‘dhcp-lease-list‘ lists the DHCP server’s lease file, which may be useful to determine internal device IPs.